
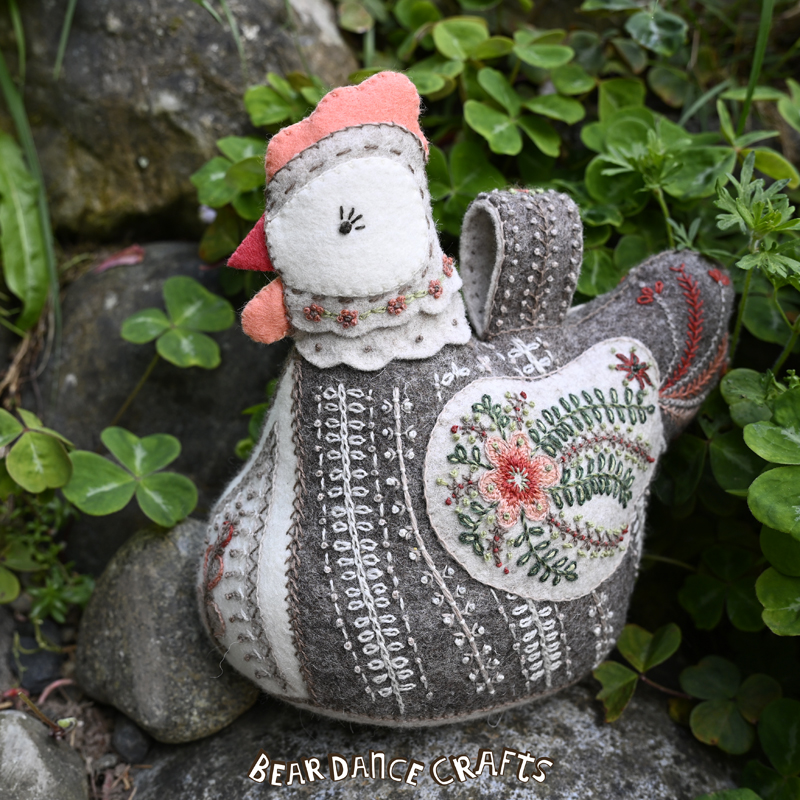
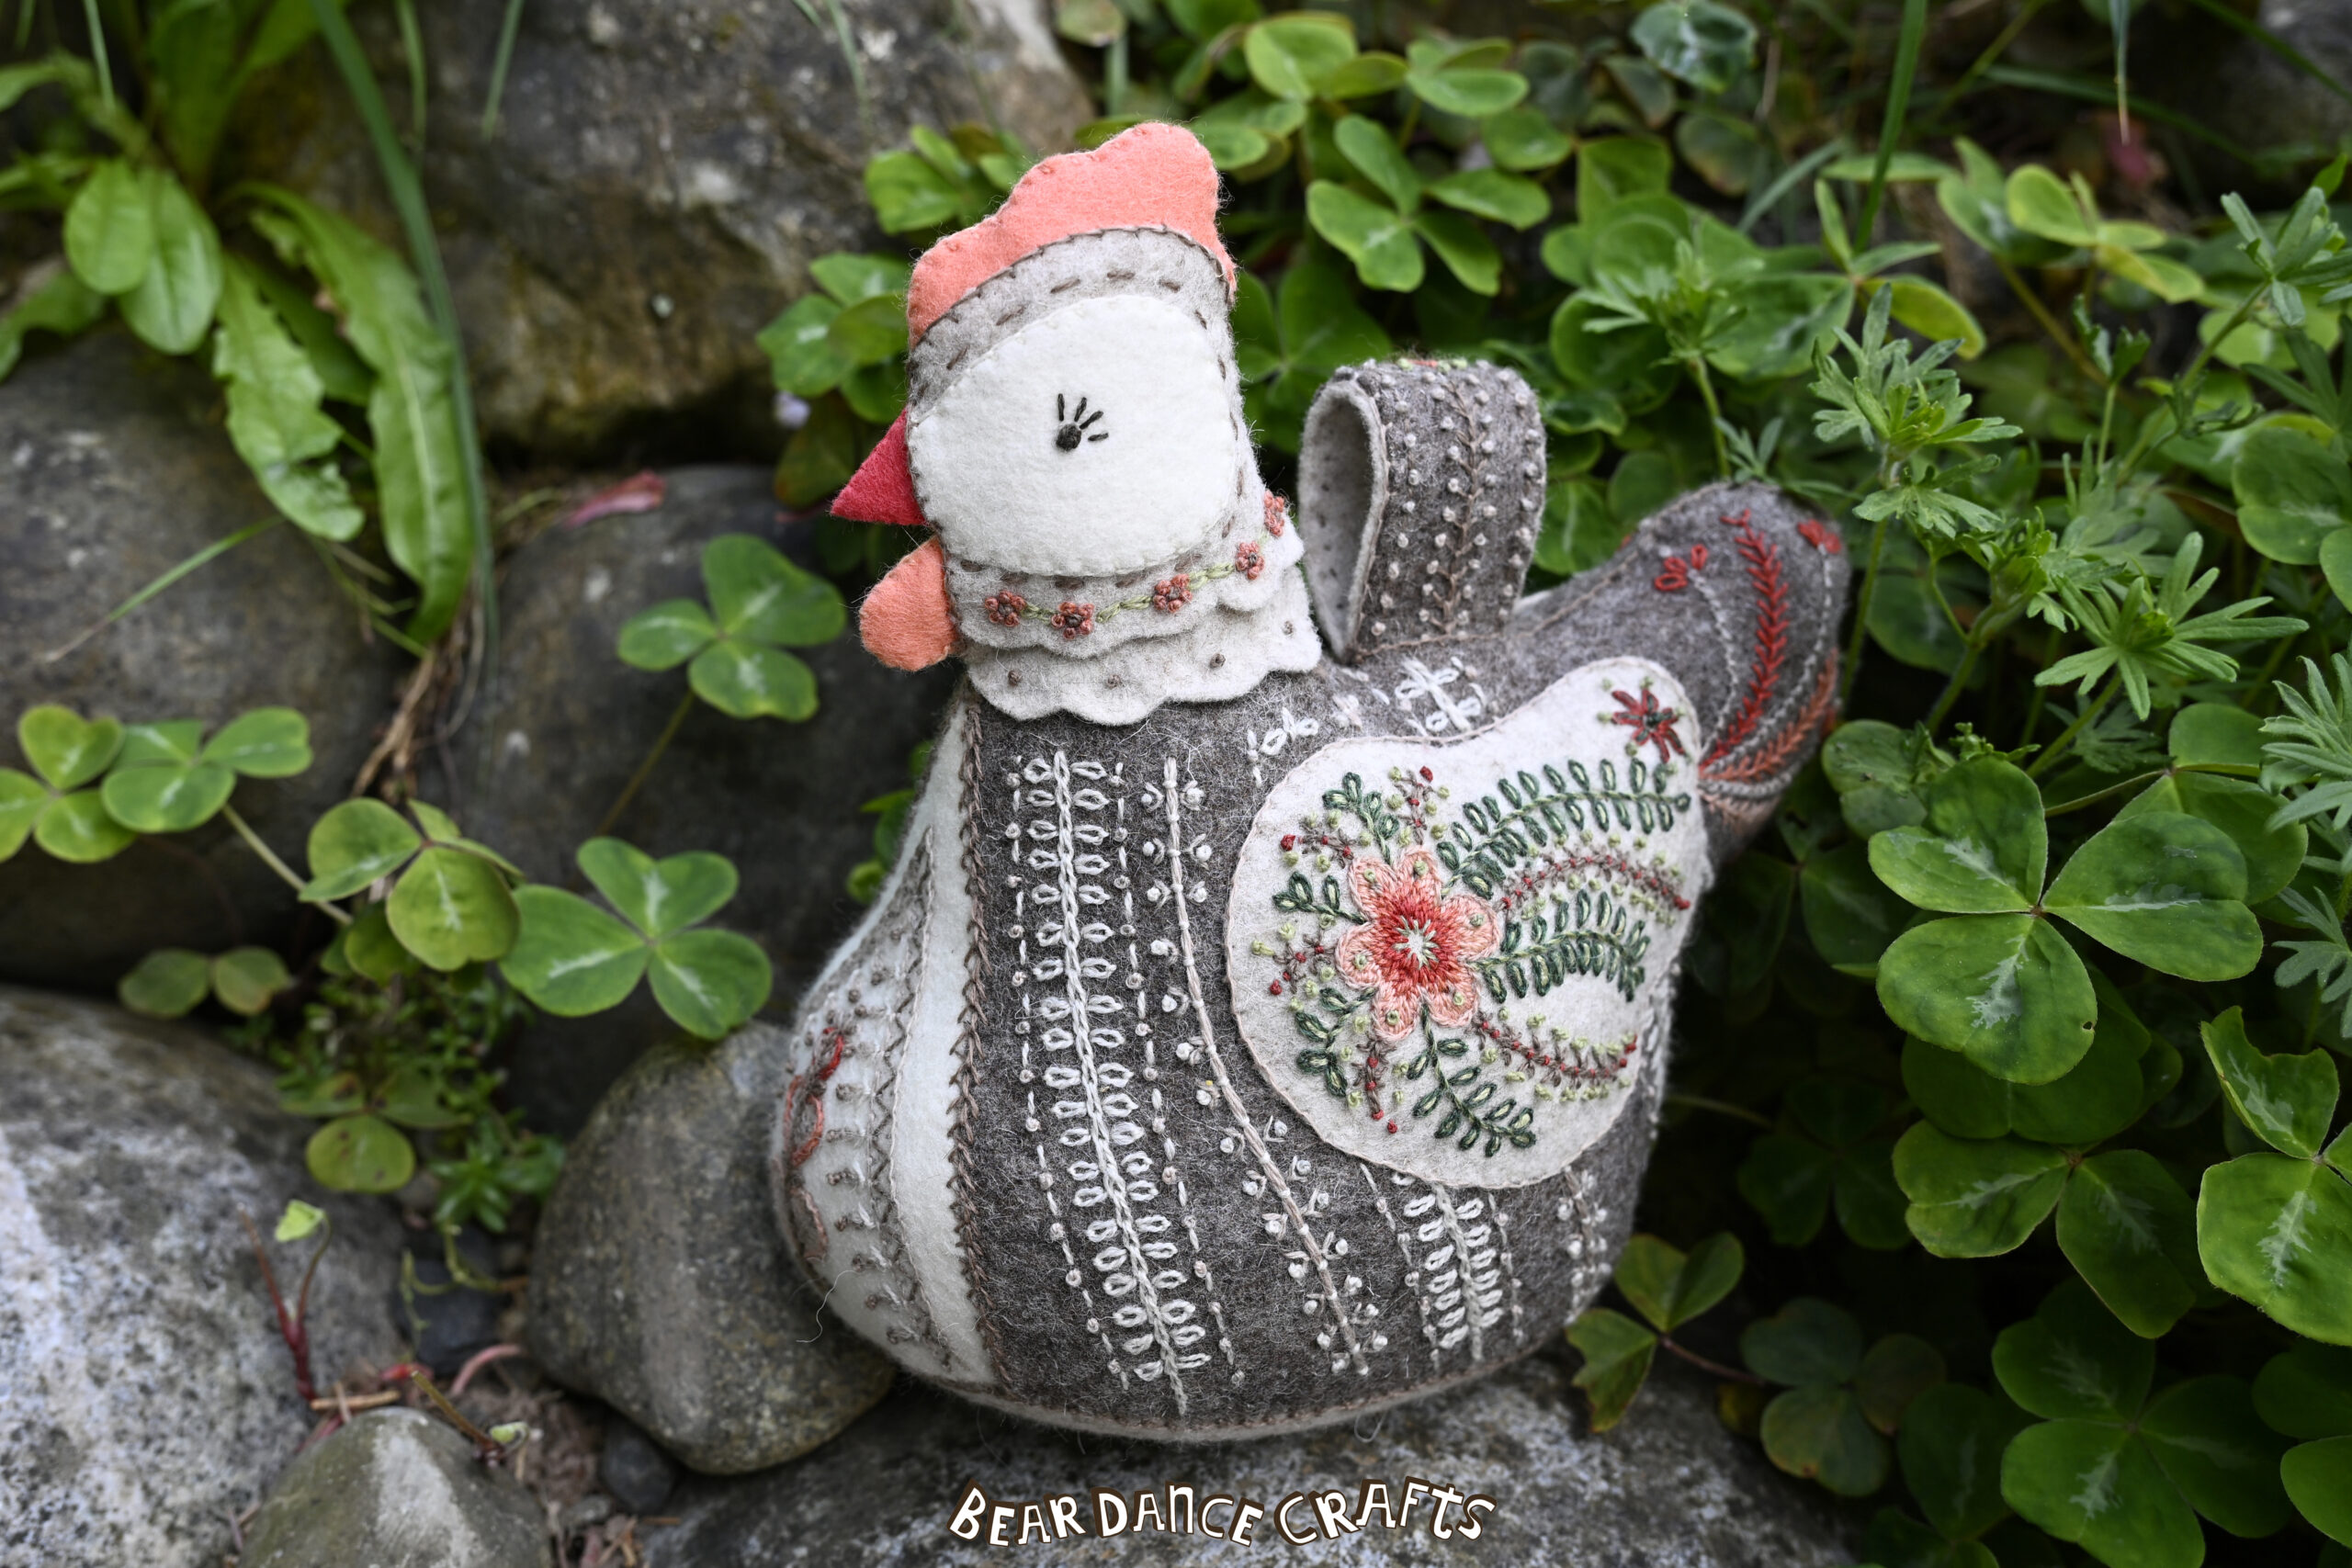
This spring, undyed heather felt was flying off the shelves, and I couldn’t wait to see what had the craft hive buzzing… It was Harnie the Hen!
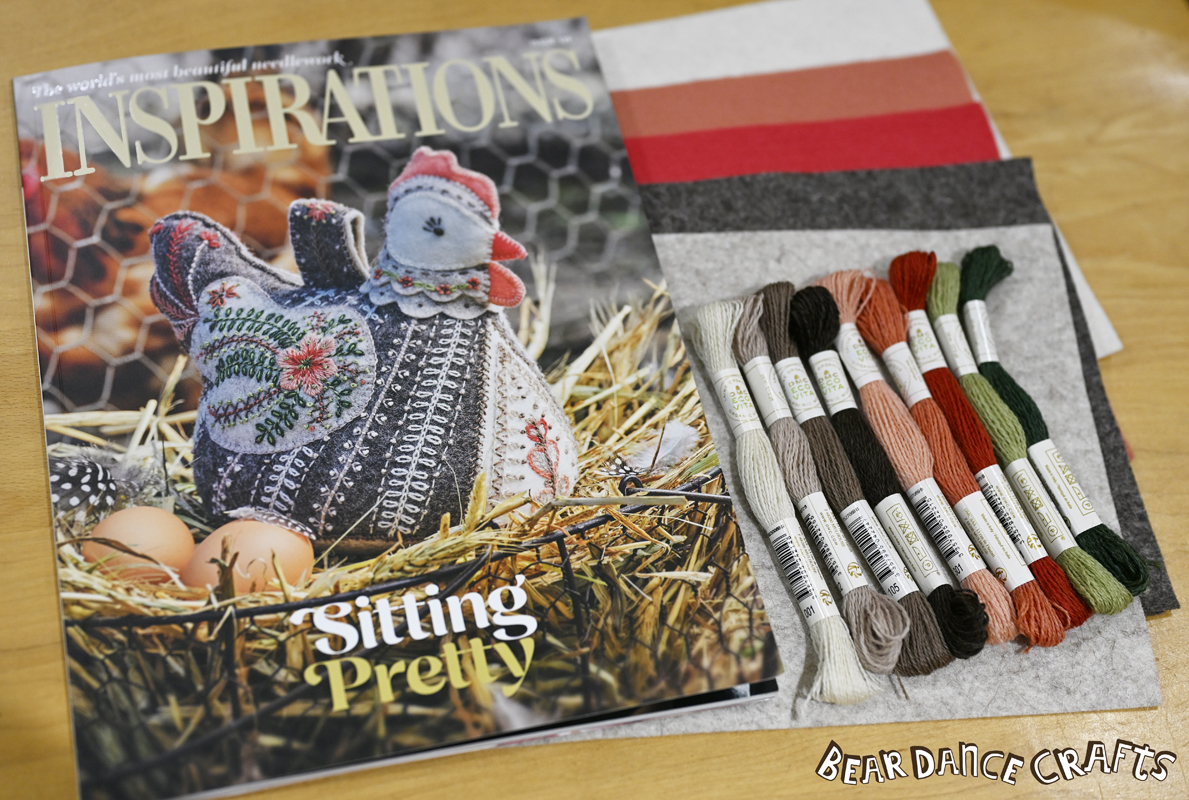
Featured on the cover of Inspirations magazine Issue 129, Harnie the Hen is a surface embroidery project by artist Carolyn Stanton of Australia. The beautiful wool felt nen is on the cover and “Sitting Pretty” – and Harnie indeed sits very pretty as she is an embroidered doorstop! Or she could just be your charming companion chicken. Or both. As soon as I opened up the project on my tablet’s library copy, I just knew I had to make a Harnie!
This project uses mainly 100% wool felt and DMC’s Eco Vita naturally dyed wool thread. This was a bigger and more detailed felt animal and embroidery project than I usually do, and as more of a beginner I sometimes found it rather daunting. So I thought I would give a little run down of how I made my Harnie, for anyone who’s feeling a bit tentative about jumping in and stitching one too 🙂
Note for the more experienced maker of these kind of projects, please forgive my fledgling approach and any faux pas…
The first thing I did: after looking over the digital edition, I made a list of the thread and dashed off to one of my “local” shops (okay, it’s a bit of a drive) to check whether they had the recommended threads.. They had the DMC EcoVita that I didn’t already have on hand, but not the silk threads of Au Ver à Soie (spoiler: I ended up subbing with DMC 6 strand cotton floss). And, they also had the paper magazine edition for sale, which I happily added to my purchase (digital is okay, but I do so like the real deal).
With the magazine and some of the supplies in-hand, I then couldn’t decide on the exact felt colours for the comb, wattle and beak – so decided to wait until I had the body and head parts embroidered (first choices pictured above).
Starting felt list for Harnie:
1. “dark beige marle/brown” I used 2 regular sized sheets Natural Medium Brown (undyed) NWF012
2. “light beige marle/oatmeal” I used 2 regular sized sheets of Natural Light Brown-Grey (undyed) NWF100
3. “ecru”, I used less than half sheet of Ecru (undyed) WWF091
Embroidery design transfer workaround:
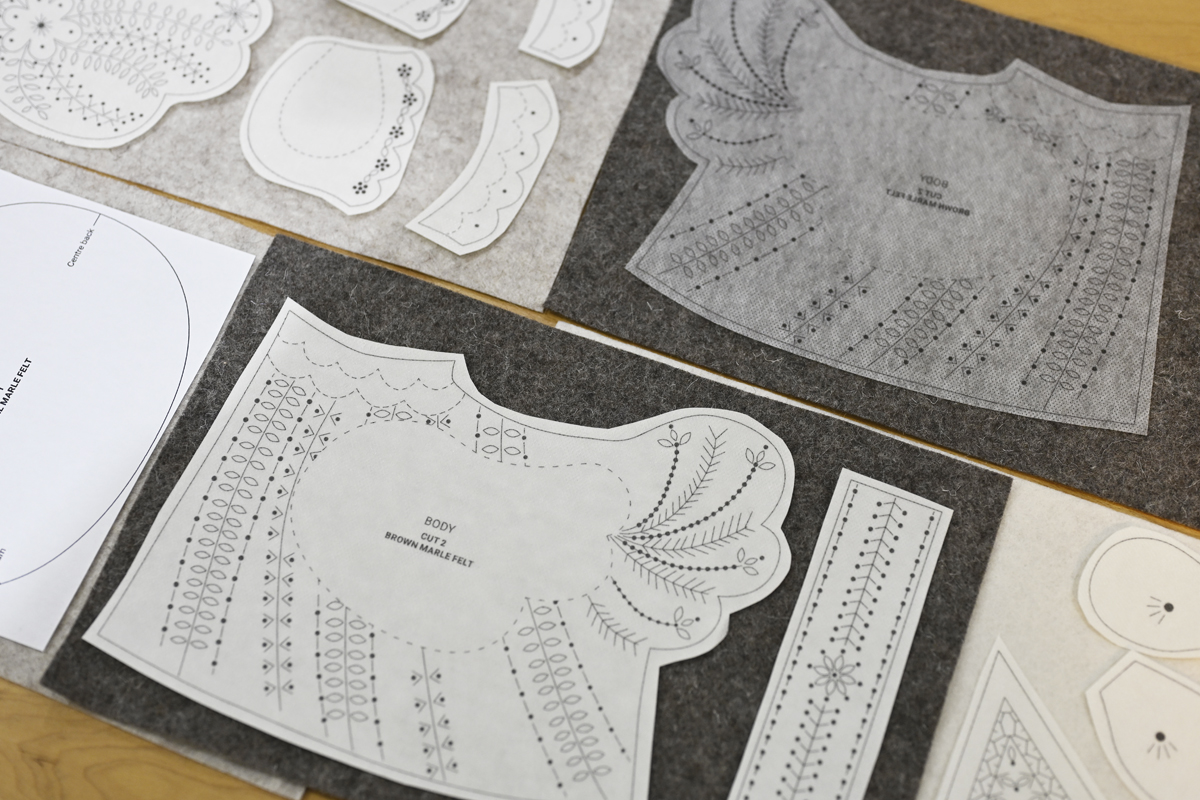
As the instructions use a lead pencil to trace the pattern, markings and embroidery design. Well, er, um… full disclosure: this is not my forte! Here is what I did for a workaround, so that I would also have a perfect pattern to embroider:
1. Using the patterns from the magazine template I scanned them onto my computer, and put them on a regular letter size paper sized blank page in photoshop (8.5 x 11″, approx. A4 size).
2. Once I thought they were the same size as the actual pattern, I printed a paper one out and checked by holding them both up to the light. If you find it’s off, adjust and reprint. If it is still off, check your print settings to see if you have something checked off that is altering the size when printed vs ‘print actual size’ or something to that effect.
3. When size is correct then make a copy and paste of the pieces that are going to be having reversed pieces like the body, wings and head, etc. Take a duplicated image and reverse it as you will need it mirrored. For example, the wing had the flower on the left side on the pattern original, you will now have one reversed where the flower is on the right. The text on the body piece will be backwards (you can see a slightly fizzy reversed body text below on the top right).
4. Rookie mistake: As I made all the pattern pieces like I had seen them in my digital edition, so I ended up using more sheets of Stick ‘n’ Stitch than I could have if I had been planning a bit better. I printed 6 pages of the pattern pieces onto Stick ‘n’ Stitch, which if you are unfamiliar with… is my embroidery ‘secret sauce’. You print on it, stick it onto your project, stitch right through it and when you are done stitching your soak the product in cold water and rinse it off. This can alter the wool felt!!
As I have used it a lot on felt before, I decided not to pre-soak my felt (yes, I do live dangerously!). That being said, pre-soaking is always recommended with any fabric that shrinks, which the 100% wool felts can do.
The embroidery:
The project recommends specific needles, but my go-to was the Bohin needles from the Embroidery # 5 pack for most of the embroidery, plus the 18/20/24 pack for some of the other sewing (with cotton DMC).
As I couldn’t find the Au Ver à Soie silk threads in the project colours, I substituted with DMC cotton. Most of the time I used 3 of the 6 strands. For couching I used 4 strands.
The colours I used were DMC 3103, DMC 355 (not my top choice, but it was on-hand), and the DMC3033 in 6 strand instead of the No. 8 DMC perle cotton #3033.
For any unfamiliar or stitches or ones that needed a refresher I checked my book collection or did a Google and YouTube search. No particular fave to recommend here.
It all went well, I stitched. Then I stitched some more. I then thought of the person who said it was a quick project, and wondered if I had misheard?!? I loved the stitching details, and working with the lovely Eco Vita naturally dyed threads was a delight. The DMC 6-strand cotton that I substituted seem to work just fine.
The biggest stitching issue I ran into was the handle. The markings on the pattern piece looked different to what thought I was seeing in the magazine photos. This could have just been me, of course -as the most likely explanation. I decided to embroider what I thought was on the pattern piece, and in the end I would rate it “okay”, and go for a little less stitches next time and more how the photos looked to me (less embroidery).
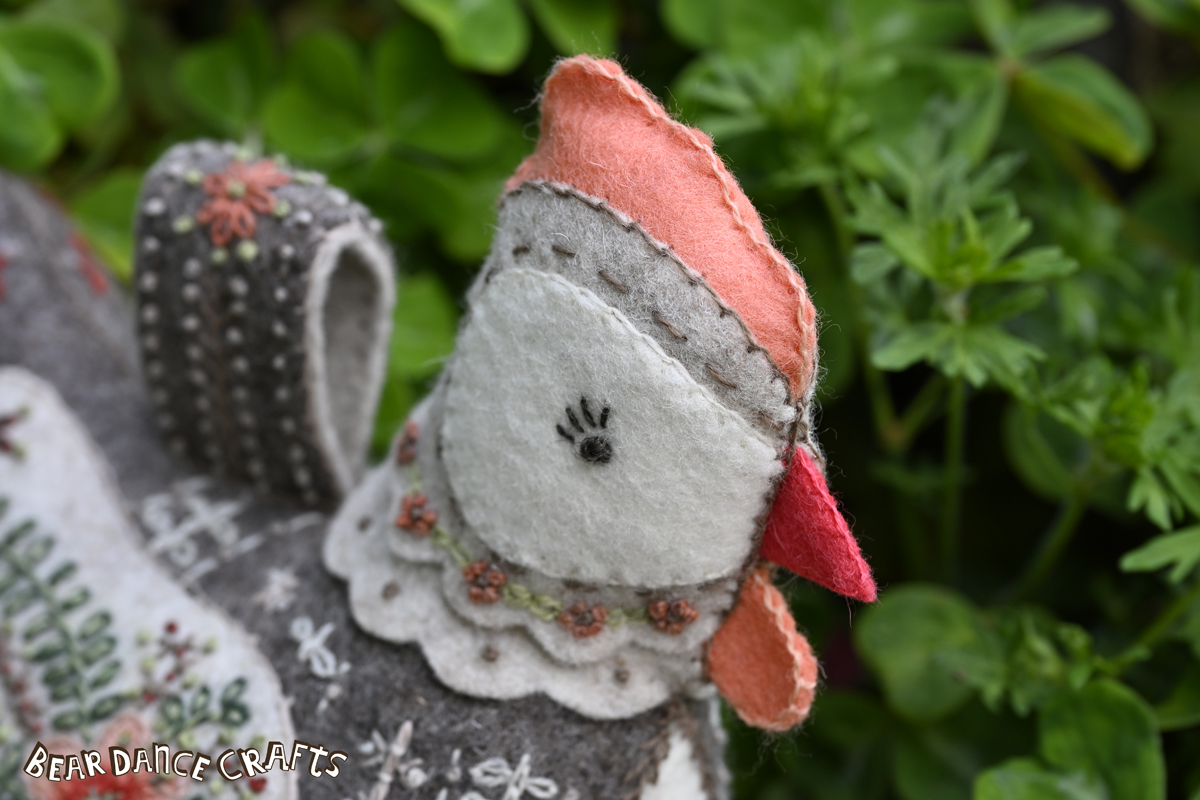
The comb, wattle and beak:
One of the biggest challenges I found was deciding on the felt colour for the comb, wattle and beak!
The difference between the colours in the magazine photos, and in the description and on the pattern page differed – at least for me. And, I was trying to get my Harnie the Hen as close to the original as I could on my first try, this led to a whole process of looking back and forth trying to decide. I mention all this, in case you decide you are interested, if not, skip to below the next photo…
For example, the instructions say ‘dark salmon’ and the pattern says ‘peach’. My first thought was to use “Dusty Salmon“, then “Coral Orange“, as I would describe that as a dark salmon colour. But, in the end once I got to the part where I needed to add the comb and wattle, I made two options to compare against the hen’s undyed heather felts.
For the comb and wattle I chose “Salmon“. The Coral Orange was nice, but it felt a bit more intense, and I liked how the Salmon tied more into the gentleness of the wool thread colours.
For the beak, there is also two colours listed and I was thinking something like “Flander’s Fields” for the tomato/scarlet in the instructions/pattern.
In the end I chose “Watermelon” for the beak as I thought it paired well with the Salmon comb and wattle.
Colours are so subjective, and I might chose differently if I make another Harnie.
Note on the “interlining”: I used the Pellon 70 Pelltex stabilizer that is included in supply kits from mmmcrafts. It is fairly thin and keeps it shape, and it worked out great for the comb, but less so for the beak. Next time I would trim the beak bit a bit more or attach it slightly differently or better, as it ended up a bit uneven and pulls to the side slightly (see photo below) – my meticulousness is showing!
Putting it all together:
At times I found the instructions a little confusing when putting Harnie together, and found if I just did each step line by line that helped.
Another rookie mistake was when I joined the body bit on the top, where the head sits on top of. It made the head look super weird and I didn’t hesitate to take it off and re-do it.
For the bottom ‘ thin wadding’, I used some thick pre-felt I had kicking around in the workroom, and it worked great – 10/10 would use again.
Then for the beanbag, I changed things. Well, I did use the beanbag template and some undyed cotton fabric with a tight weave for it, and triple stitched the size the template by machine. I also attached the beanbag as recommended. I did not use soya beans/rice or any other food stuffs. Though many people live in places where doing that is fine, here on the wet west coast it is a recipe for mould and who-know-what. I am having flashbacks to a draught snake that sprouted once, though the beans were most definitely baked. Anyhoo… I opted for glass bead weighting. it’s fine like sand and weighty. Cheap glass half marble pieces like you might put in a terrarium could work too – if you live in a damp zone like me.
For stuffing, I used wool stuffing as recommended. If you are using wool, I urge you to make sure it is clean, as moths be lovin’ the unclean wool with matter still in it. Most commercial wool is treated during production with a moth repellant.
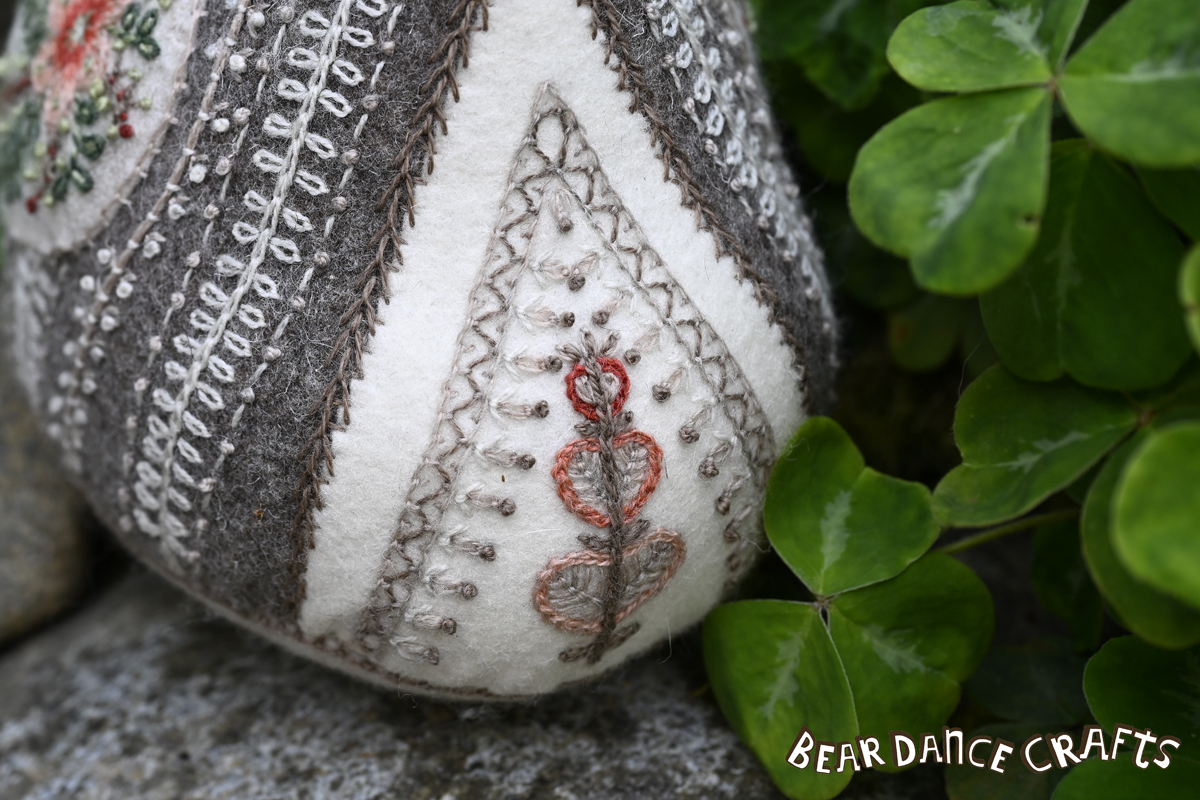
Note on Palestrina Stitch: this is a stitch used a joining stitch. It’s a wonderful decorative stitch that I wasn’t familiar with, and here’s how it looks on the front of the join of Harnie’s breast to body:
Goodbye Harnie:
Well, once I had my amazing doorstop/hen friend all done I wrapped her up and gave her away to my mom. If your mom is like mine, she has everything… except an adorable hen doorstop! It was the perfect Mother’s Day present. Besides, I got a puppy in the middle of my hen stitching marathon, and this way Harnie stood a better chance at surviving out of reach from a teething puppy – at least that’s how I am consoling myself after parting ways! Of course now I’m eyeing up a previous Inspirations magazine Floe the Fairy Penguin pattern by the same artist. Carolyn Stanton also has a Kookaburra doorstop pattern in her Etsy shop too… This my friends is a slippery slope!!
PS: hopefully I covered all my notes! Feel free to comment with any tips or suggestions or ask a question 🙂 Natalie
All photos are original copyrighter content by Natalie at Bear Dance Crafts. Harnie the Hen is a project by Carolyn Stanton featured in Inspirations magazine of Australia.
Just got my Harnie kit from Inspiration Studio and now feel more confident about starting! I cobbled together Floe with cheap felt and DMC cotton to practice. I appreciate the glass bead tip! I’m also glad to know that sulky sheets work on wool felt as I’ve never worked with wool.
Thank you for your comments and I hope you have lots of fun making Harnie 🙂